Once I learned about SoftEther VPN, I realized I was missing out on a lot. In this article I will show you how to setup a Client to Site VPN without needing to setup any rules in your firewall (port forward rule), Very NICE!.
Here is a quick image of a client to site VPN:
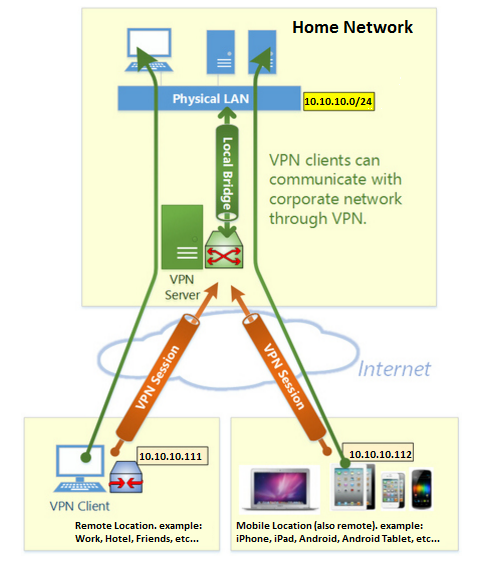
We will setup a connection that allows a remote computer/mobile (thats in the different part of the world, that has internet) to connect to our home network, all traffic will be tunneled thru the internet (meaning it will go thru the internet but it will have a hard shell of encryption around it. Imagine a tunnel going thru the ocean from a building to your home in London. The ocean represents the open and wild and unsecure internet. The building represents some remote location. The home represents our home network. The tunnel represents that we are going thru the ocean/internet to our home, but we are safe from its obstacles … encryption)
SoftEther Features and Tutorials
Check out this full feature list of SoftEther (it can do a whole lot more than just client to site VPNS): https://www.softether.org/1-features and this one https://www.softether.org/1-features/1._Ultimate_Powerful_VPN_Connectivity
For example: if your in a hotel that blocks most TCP traffic, but for some reason allows pings. Well you can setup a VPN that encapsulates/tunnels everything in ICMP packets. So to the hotel admins it will just look like really beefy ICMP packets (which might or might not be blocked… most hotels dont have strong security as far as I understand)
Some of their tutorials are here: https://www.softether.org/4-docs/2-howto
You can set it up to work like a regular VPN server on a server which needs a port forward, or you can use its azure system which bypasses the need to do port forwards. I will cover the most interesting method, the one without port forward. I think you will see how easy this is easy to implement and realize on your own how to set one up with a port forward (if you wish to do it that way).
Honestly though why wouldnt you want to set up a VPN without needing a port forward. You dont have to worry about configuring any routers/firewalls for port forwarding which makes life a lot easier. The negative side of bypassing port forward rule creation on your firewall (bypassing NAT) means there is got to be a 3rd server (the azure softether server), and that means that both sides (remote and client) connect to the middle server (the azure softether, 3rd server). Im not sure if the data flows thru there once the connection is established. If it does im sure you dont have to worry about security as everything is encrypted. However if data flows thru the middle server we might be bogged down on our bandwidth/thruput (there is no way there middle server can handle the traffic of every softether azure connection) and also latency. So I assume its just negotiating the connection, making our routers believe there is a connection by hand holding the creation of the connection, and then once the connection is made both sides can switch to communicating directly. So the if im correct after all of the connection business with azure setup is done, your data connection will be directly between your client and your remote (not going thru their middle server). Every time I used azure it was pretty fast (but then again my bottlenecked thruput, my upload at my house is pretty miserable == Comcast). Anyhow I assume they use this later method and the data doesnt flow thru any middle man. (kind of like the leafp2p patent vpn technology that is used in http://patentimages.storage.googleapis.com/pdfs/US7646775.pdf )
UPDATE: I just tested the connection below and I got the following message because I dont have a port forward. It uses UDP hole punching as the method. Its recommended to setup a “hole” / port-forward so that a more reliable VPN connection is established using TCP. Here is the message that appeared upon a successful connection without setting up a port forward at the server side:
** Connected with NAT traversal – might be unstable **
This VPN Client is connected to the VPN Server ‘CEO’ by using the NAT Traversal (UDP Hole Punching) technology.
NAT Traversal allows the VPN Server behind the NAT-box to accept VPN connections from VPN Client without any port-forwarding setting on the NAT-box.
However, NAT Traversal-based VPN sessions sometimes become unstable, because NAT Traversal uses UDP-based protocol. For example, the VPN tunnel disconnects every 5 minutes if there is a poor NAT-box between the VPN Server and the VPN Client. Some large-scale NAT gateways in cheap ISPs sometimes cause the same problem on NAT Traversal. This is a problem of routers or ISPs. This is not a problem of SoftEther VPN software.
To solve the unstable tunnel problem, you should connect to the VPN Server’s TCP listener port directly, instead of using NAT Traversal. To connect to the VPN Server directly by using TCP, a listener port of the VPN Server must be exposed to the Internet by a port-forward setting on the NAT-box. Ask the administrator of the NAT-box, or refer to the manual of the NAT-box to add a port-forwarding setting on the NAT-box.
If this message still remains despite the VPN Server is exposing a TCP port to the Internet, check the “Disable NAT-T” checkbox on the VPN Client connection setting screen.
What we are going to setup: Client to Site
So what we are setting up is a client to site VPN connection. The site will be my house and the client will be any PC that wants to connect to my homes network. The Headquarters of the VPN server will be installed on a windows PC (however it can be installed on a Linux or MAC), and it will be managed thru a VPN server manager application (that can be on a different PC, however we will set that up on the same PC as the VPN server)
Download the following software here: http://www.softether-download.com/en.aspx?product=softether
- SoftEther VPN Server Manager for Windows (that will install VPN Server, VPN Bridge and VPN Server Manager)
- SoftEther VPN Client (that will install VPN Client and VPN Client Manager)
I have one network at home that I want to install a VPN server. Then when I am at work or anywhere in the world, like traveling to Paris (I never travel to Paris), I can VPN client into the network. (NOTE: SoftEther supports settings up VPNs that travel thru ICMP packets, so you can literally encapsulate your data in pings, so if your in some run-down-but-very-high-tech-secure hotel that only allows pings – for some reason – then you can do this)
My home network is:10.10.10.x for the sake of this example. And my router does simple DHCP which gives out 10.10.10.x address (i will get one of these addresses on my Virtual Network Interface when I connect in to the VPN from the client). My routers IP is 10.10.10.1. And my main IP of the VPN server is 10.10.10.7.
Setting up the VPN Server (the network I want to connect to)
On my Windows PC I download SoftEther VPN Server (there is MAC and Linux versions). Installing the SoftEther VPN Server Manager for Windows will install 3 pieces of software: SoftEther VPN Server, SoftEther VPN Bridge, SoftEther VPN Server Manager.
The SoftEther VPN Server – runs in the background and its the service (you can see it in services.msc and you can see it running in tasklist as vpnserver_x64.exe tasklist | find “vpnserver and you can see it listening on ports via netstat /nao | find “<insert process id of vpnserver” (443,992,1194,555,61286)
The SoftEther VPN Server Manager – thats software we will use to configure SoftEther VPN Server
The SoftEther VPN Bridge – Im not sure what this is, but I assume it bridges the connection between the software to your listening interface (not sure)
We will only use the SoftEther VPN Server Manager. So open it up.
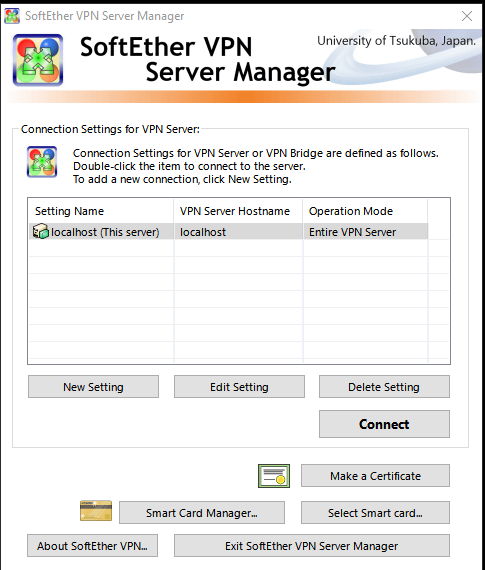
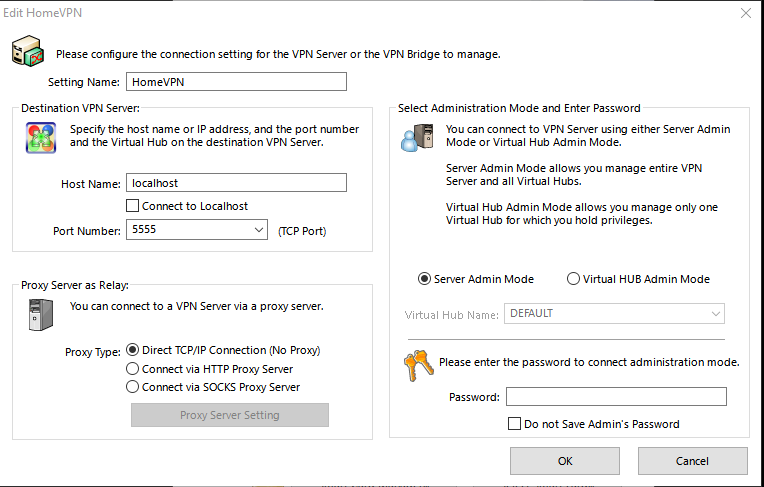
The first thing you need to do is make a “New Setting” (unless you already have the default one called “localhost” – see screenshot above. in my clean install I had it. Lets just rename it to “HomeVPN”. Click on “Edit Setting” and rename the “Setting Name” to “HomeVPN” and click Ok. When done click “Connect” and move to next paragraph ). These “Settings” are used to manage different VPN Servers. So we set the “New Setting” Setting name to “HomeVPN”. We then set the Hostname to “localhost” and pick one of the port numbers (just leave it as 5555). Then save it. And click on your new setting and click Connect. Now we are connecting to theVPN Server managerment (why all this? becaues you can manage other VPN Server with this VPN Server management tool – so you can have a VPN Server on a Linux box, and manage it thru your Windows PC with this Server Manager tool).
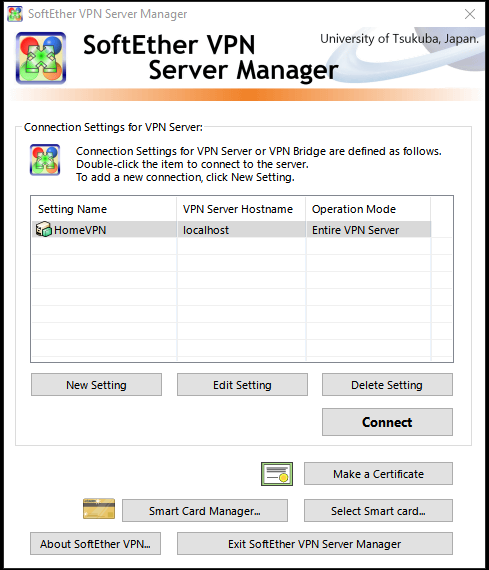
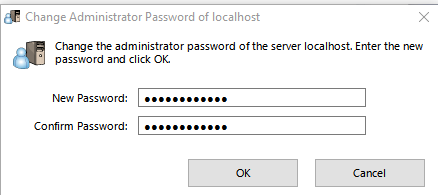
NOTE: you might get prompted to setup an Administrator password when you first Connect. Thats the password to manage / change settings of “HomeVPN” setting. Dont forget it. I set it to something like “mymanagepassword”.
The first thing that comes up for me is the QuickSetup (the window is titled SoftEther VPN Server / Bridge Easy Setup). I just go thru that and when we are done with it, its all ready. However if you dont get the QuickSetup then try to follow along my steps. If you cant find what im talking about search for it by clicking on all of the buttons in the regular interface until you see the option I clicked (most buttons open more windows etc and the GUI is pretty straight forward in letting you know when your about to change a setting, so following along should be easy). The regular interface will make sense (each button opens up a new screen of options, there seems like there are alot of options, but you really dont have to have that many things setup to get it running).

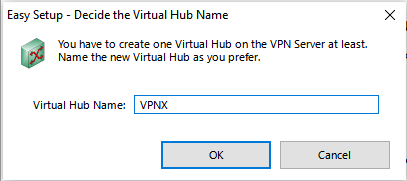
Anyhow, back to the QuickSetup. The first thing we do is select the type of VPN we want. So check the top box only “Remote Access VPN Server” (client to site) then hit Next and click Ok in the “Are you sure?” prompt. Then we create a Virtual Hub (this is just another layer of abstraction identifying this VPN that we are setting up – I assume a VPN Server can setup many different kinds of VPNs each with different rules – each instance of a VPN is called a Hub. We will just setup 1 hub that runs IPSec and L2TP and uses azure – the best way to thing of a Virtual Hub with SoftEther is that its just a set of VPN options. Maybe you have one VPN HUB that only lets you access 1 subnet in the network, and another one that only lets you access 1 server in the network ). By default its “VPN”, just change the Name of the Virtual Hub something cool like “VPNX” (name doesnt matter, but remember it) and hit Ok.
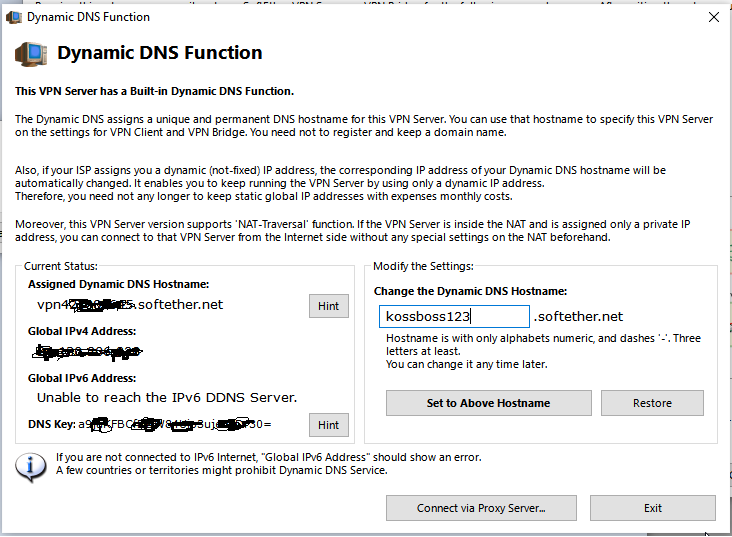
Now you are faced with your azure settings, enable it with the checkbox and change the hostname. By default you will get something like vpn490566973.softether.net, instead change it to something like infotinks123.softether.net (this is an actual fqdn that can be used and will ping back your home routers wan ip – so if you have DNS this is redundant, but redundancy isnt bad). Hit Set Above HostName. You will notice that you see your routers IP: x.x.x.x (should be a public ip and not a private ip). You will also see your DNS key (it looks like this 0+8k543x+st+8xtn12345cWt9Vr0=). I never had to use the DNS key in the setup for the server or client, so Im not sure what its for (its probably used in the backend for some sort of server to azure authentication). Setup your proxy server connection if you need it. I dont need to connect via Proxy so im not going to click on “Connect via Proxy Server…”. So just hit Exit.
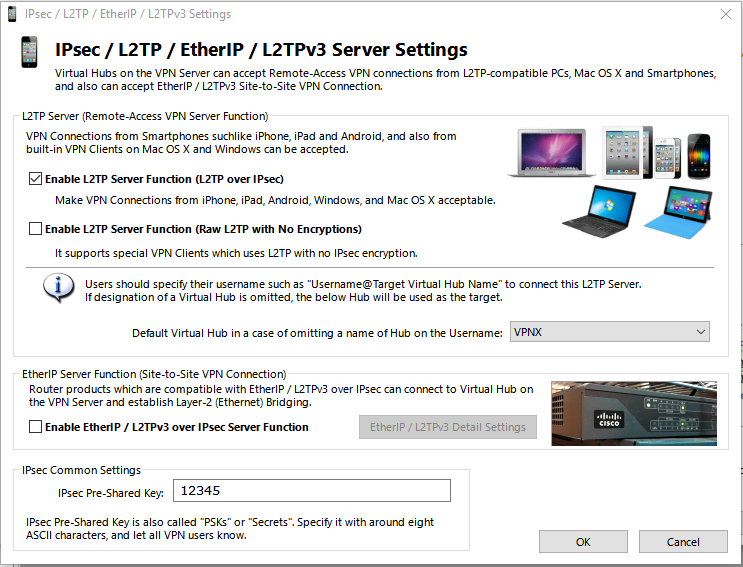
Next you will see the “IPsec / L2TP / EtherIP / L2TPv3 Server Settings” window.
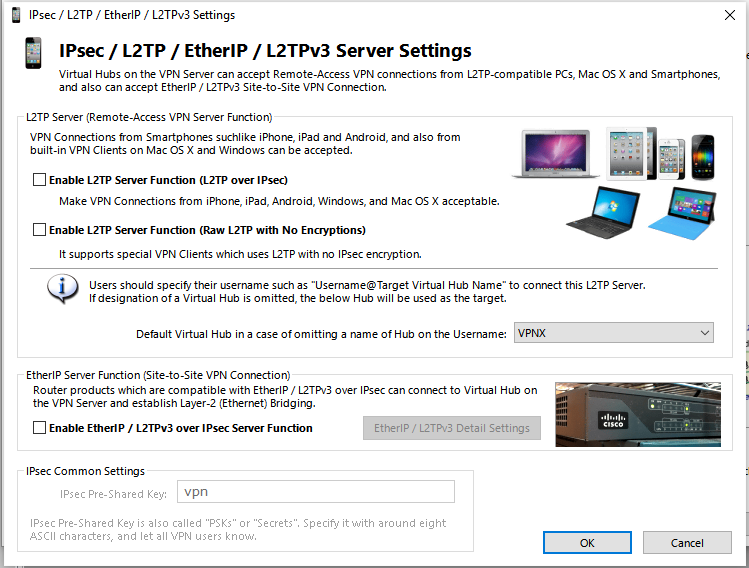
There you can check “Enable L2TP server function (l2tp over ipsec)” and do not check “Enable L2tP Server function (raw l2tp with no encryption” (for obvious reason that we want our VPN to be encrypted – yes you can have a none encrypted vPN which just acts as an unsecure tunnel to the other network). Also set your IPSec Pre Shared Key to something and write it down, I set it to this 12345 (by default its “vpn”), but you should set it to something more complex (I never had to use this IPSec Preshared key,but im assuming if I used an IPsec VPN client I would have to). Make sure the default Virtual Hub is selected with the one we created called “VPNX”. And hit Ok.
Next you will be faced with the VPN Azure Service Settings window.
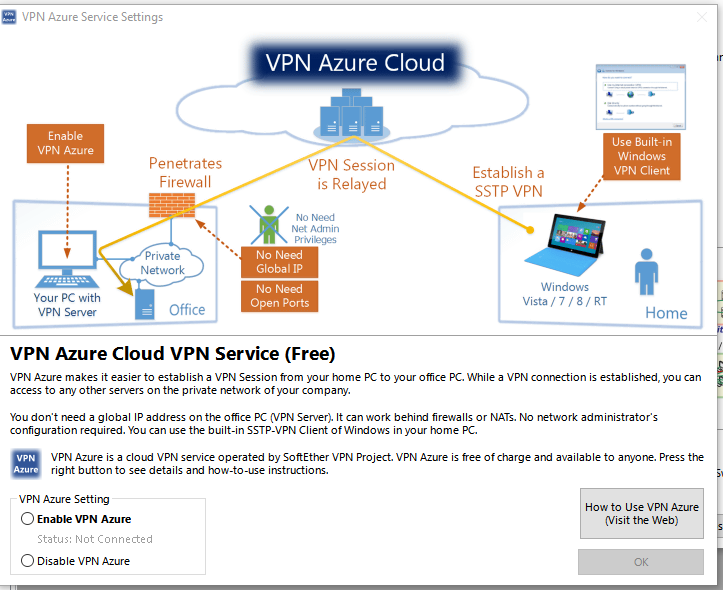
Make sure VPN Azure is enabled. Your Azure Hostname will showup again infotinks123.vpnazure.net. You can change it if you want. Hit Ok after enabling VPN Azure.

Next we are faced with 3 simple steps windows called “VPN Easy Setup Tasks”. Here we will create the user/users for Step 1 and select the network interface which will be used for the VPN (our main internet interface ) for Step 3. Step 2 will be skipped and greyed out.
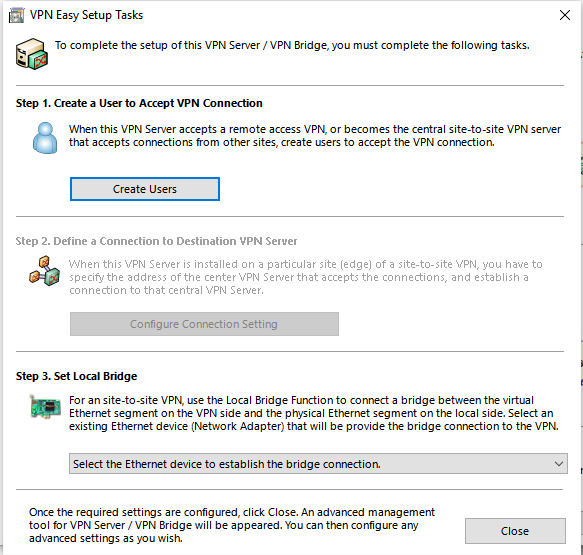
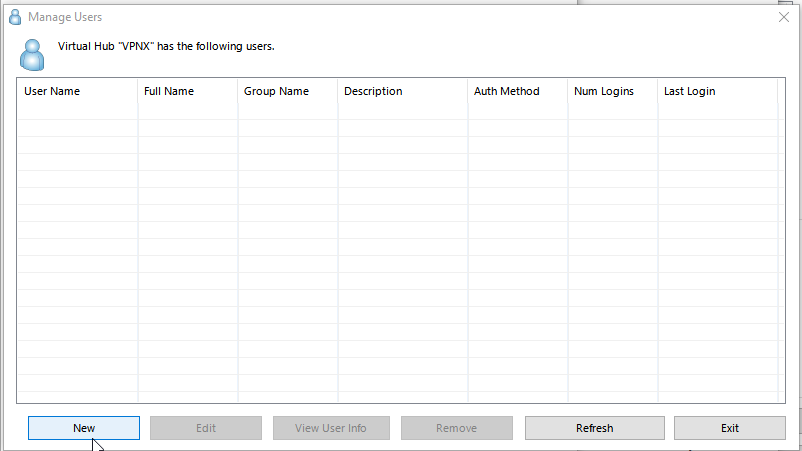
Click on create Users->New in the “Manage Users” window
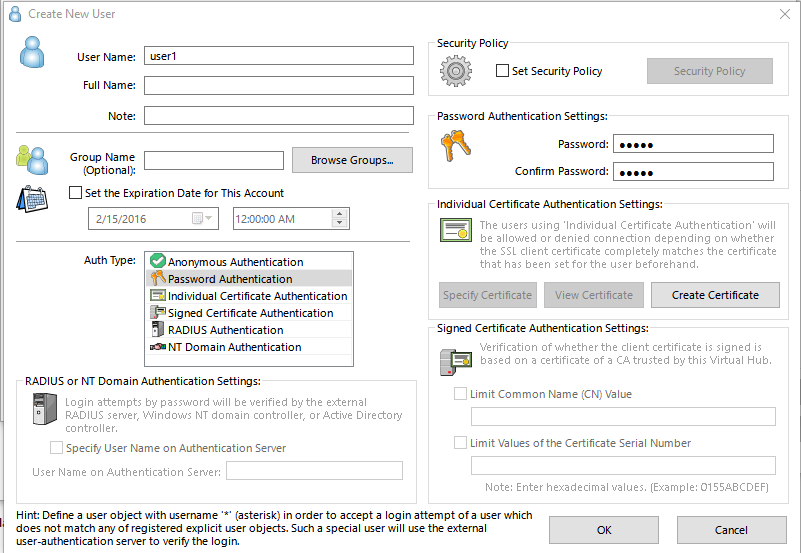
Now create a user. Username: user1 (you will use this user). Set its Auth type to “Password Authentication” and set your password to something complex like “12345” (just kidding set it to something alot stronger). Hit Ok.
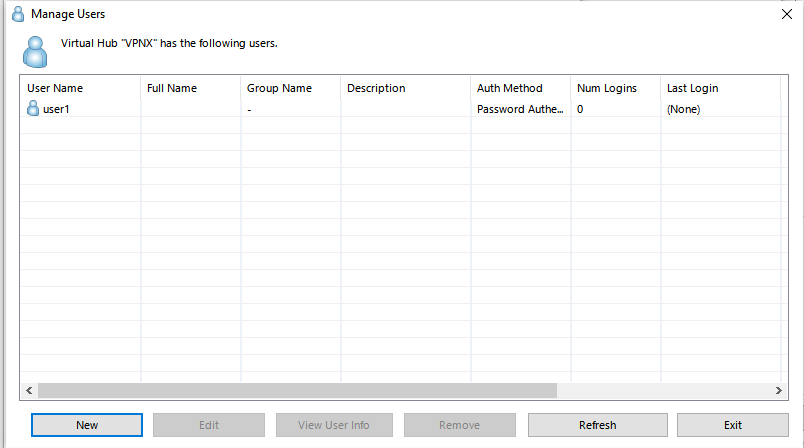
You will see your user1 in the list now. Hit Exit.
Back in the “VPN Easy Setup Tasks” window. We just finished step 1 (creating users). We are skipping step 2 (its greyed out). Next and final step 3 in this window and actually final step for the whole server config, you will set Local Bridge interface. I picked my “Local Area Connection” interface which is called “Ethernet [Realtek PCIe GBE…]” (open up Windows->ncpa.cpl->and confirm the name of the interface you should connect to).
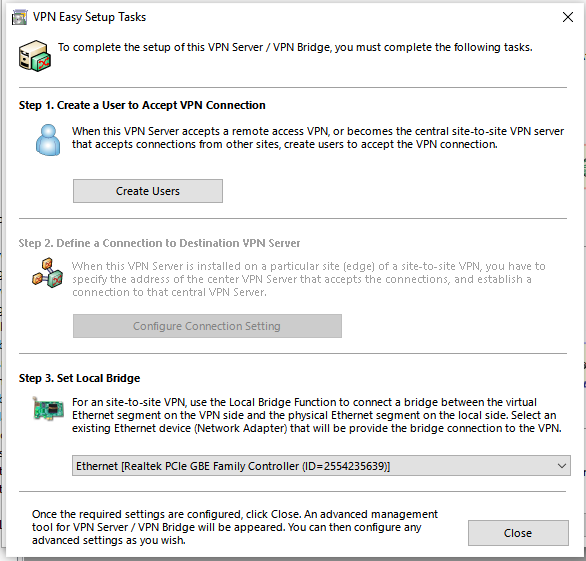
Hit Close & that completes Quick Setup and we should be good to go to setting up the client. Now you should see the main “Manage VPN Server” window, which is what we would of seen if we didnt go thru Quick Setup. We dont need to do anything here, just hit Exit.
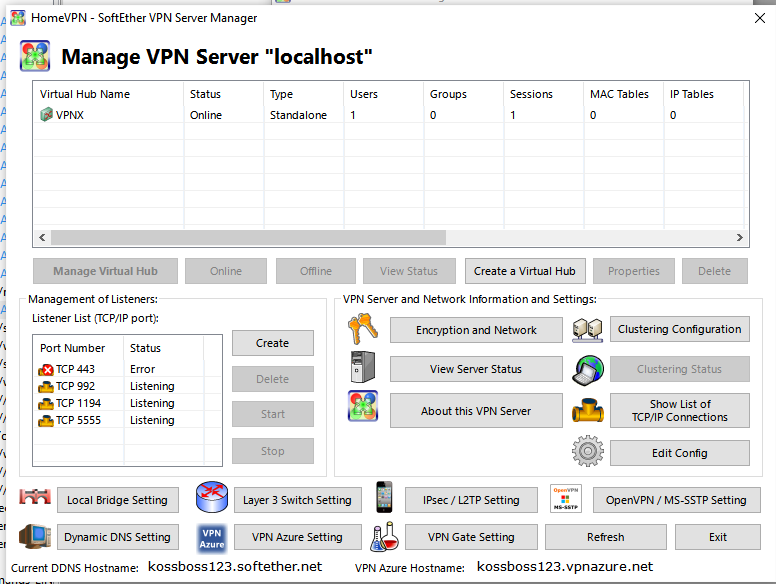
NOTE: ignore in the picture that my Port Number 443 has an Error. We also have the other ports we are listening on. 443, 992, 1194, 5555.
So now we have created a virtual hub on our home windows PC which allows a client to connect and access anything on the network. The only information you will need is your azure fqdn which we set as infotinks123.softether.net and also your virtual hub name which is VPNX and your port your running the server on (which is 1194, 5555, 443, you can use any of those), and your username and password which we have as user1 and 12345. Also dont forget to note the password which you picked when you created the setting mymanagepassword.
NOTE: obviously you can mess with the settings to get alot more things or more ACLs (Access Control Lists) setup so that clients can only access certain parts of the network or routes so that clients can access more parts of your network/
Setting up VPN Client
So im at work or in Paris and I want to connect.
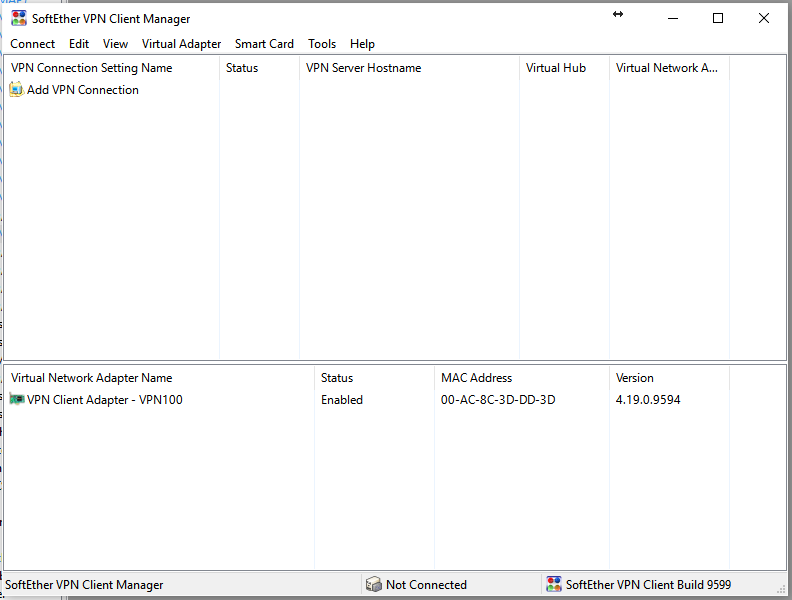
Well make sure to download the VPN Client which comes with the SoftEther VPN Client, and the SoftEther VPN Client Manager.
Open it and the first thing you want to do is right click on the bottom window and create a new Virtual Network Adapter (this creates a new interface which you can use to connect to one VPN Servers virtual hub, we will use it to connect to our homes VPNX network). All you have to do is give it a name, name it like VPN100 (note after Windows 8.1 your limited to names like VPNxxx, where as in Windows 7 I could pick “MyLuckyVPN”). That is all you need to do to create a virtual network adapter, just give a name.
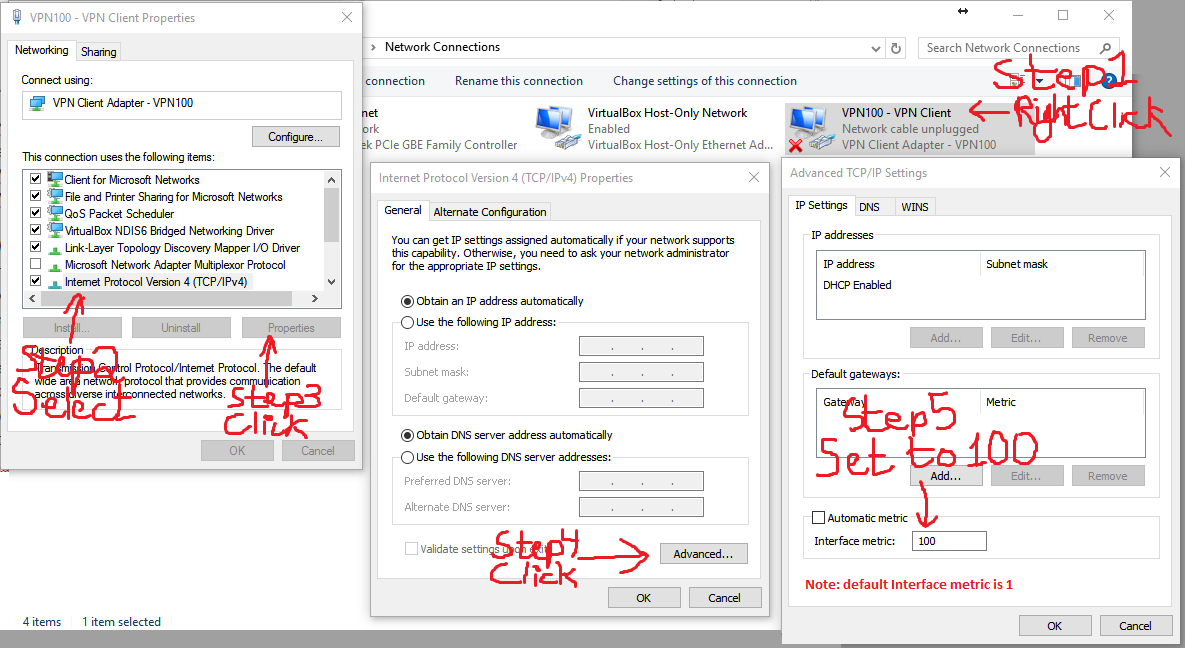
Next we need to change the VPN from full-tunnel to split-tunnel. We do this by changing the metric on the newly created virtual network from 1 to 100. If we don’t we will have full-tunnel VPN which means all of our traffic, even traffic that should not go out the VPN like browsing www.google.com or Facebook will go out that VPN (I don’t know maybe you want this behavior, if you do then leave the metric alone – but you should still be aware of how to switch to split-tunnel). Split tunnel means only the traffic destined for the remote network will go over the VPN. So open up the Windows “Network Connections” screen (the easiest way: click windows button and type ncpa.cpl and hit enter – or navigate to it thru your control panel – also you can right click on your newly created VPN100 virtual network adapter and click Open Windows Network Connections to get there as well). Once in that all too familiar windows Network Connection window, right click on VPN100 and click Properties and scroll down to “Internet Protocol Version 4 (TCP/IPv4) ” and select it (dont uncheck it) and click on Properties and then click advanced and change that metric value from 1 to 100 (make sure Automatic metric is not checked). Then click Ok as many time as it takes you to get out of the VPN100 properties and close out of the Network Connections Window.
Now back to the Client Interface, right click on the top window and select create New VPN Connection.
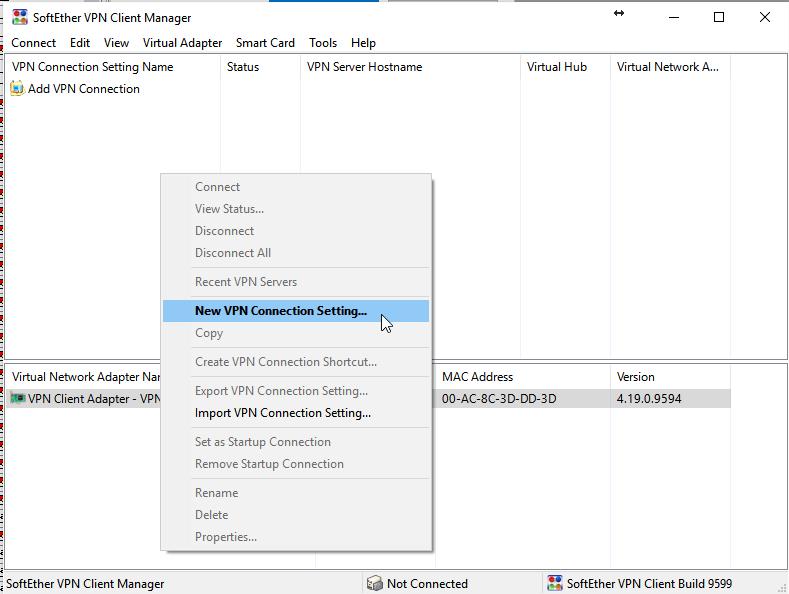
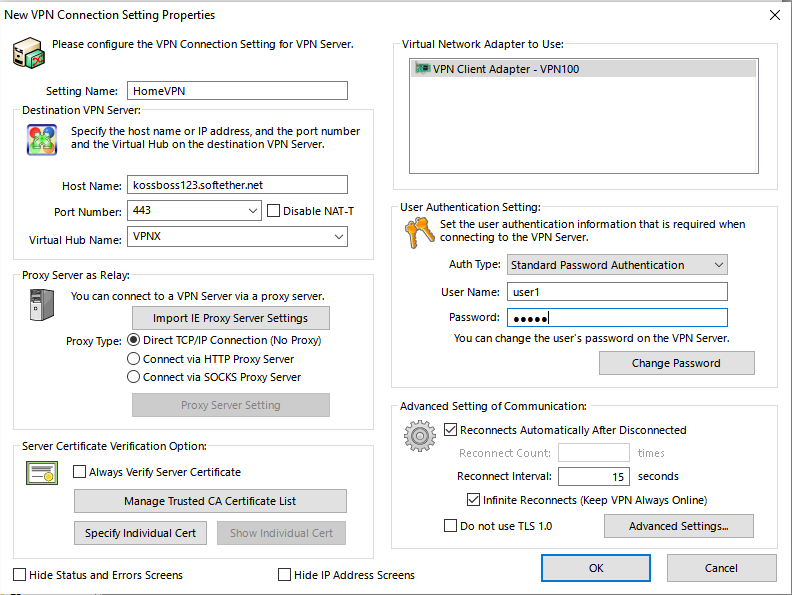
Give the setting a name like “HomeVPN” (name doesnt matter, and also it doesnt have to match the Server setting name which we picked at the beginning of the server setup. I just called it HomeVPN so that I know they are related – that this HomeVPN connects to the HomeVPN on the server). Set the hostname to infotinks123.softether.net . Now pick a port (its one of the ports we are listening on 443,992,1192,5555). I picked 443 (if it doesnt work try the other ports). Wait for a second and you should see in the Virtual Hub Name dropdown the name of your Virtual hub show up. In our case you should see VPNX. Make sure to select VPNX (even though I think it autoselects it). If it doesnt list VPNX, manually write it in (the connection might or might not work, we will know when we connect). Then put in your username and password user1 and 12345. Now save that by clicking Ok.
Try to connect by right clicking on “HomeVPN” and click on connect.

You should get a pop notification showing the connection process and then it should show you an IP address that it received from a DHCP server on that network. So I see something like 10.10.10.111. The popup will automatically disappear.
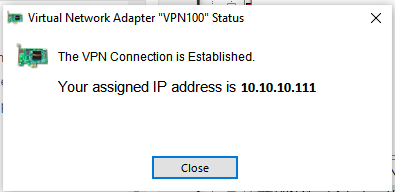
Thats it we are connected!. Now I can ping and access everything on my home network from my current location (you can now access the PC 10.10.10.7 and the NAS 10.10.10.8 – again a made up IP)
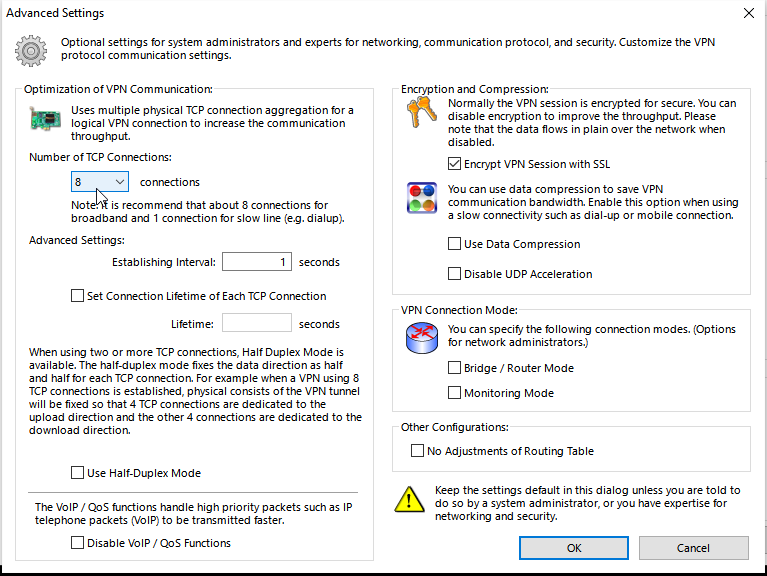
NOTE: Disconnect the connection and change your Advanced settings to increase thruput and threads by increasing the Number of TCP connections from the default 1 to 8. You can right click on the VPN config which we called HomeVPN and go to “Properties”. Now your back at the client config screen, and click on the Advanced button under “Advanced Settings of Communication” and change the Number of TCP connections from 1 to 8, this is good for broadband connections and will increase your throughput.
What about if you used the port forward method?
Well then you dont have to enable azure or pick an azure name upon server configuaration. And thats about the only difference on the VPN server side. Well… you should also port forward port 443, or 5555, or any 1 of the ports VPN server is listening from your Router/Firewall to the LAN IP of your VPN server PC. And you should also note your public WAN IP at the router which uses the port forward.
Now at the client configuration the only difference is when you pick the hostname instead of picking your xxx.softether.net you will put your WAN IP or the domain name associated with that IP.
Extra info
Getting extra information at cmd.
At the client:
Here is how the route table looks like on my Windows Client
# from windows CMD

> route print
IPv4 Route Table
===========================================================================
Active Routes:
Network Destination        Netmask          Gateway       Interface  Metric
          0.0.0.0          0.0.0.0         10.9.80.1       10.9.80.7    266
          0.0.0.0          0.0.0.0        10.10.10.1    10.10.10.111    200
         10.1.1.7  255.255.255.255         10.9.80.1       10.9.80.7    20
         10.9.80.0    255.255.255.0         On-link        10.9.80.7    266
         10.9.80.0    255.255.255.0         On-link       10.9.8.211    276
         10.9.80.7  255.255.255.255         On-link        10.9.80.7    266
       10.9.80.255  255.255.255.255         On-link        10.9.80.7    266
       10.10.10.0    255.255.255.0         On-link      10.10.10.111    356
     10.10.10.111  255.255.255.255         On-link      10.10.10.111    356
     10.10.10.255  255.255.255.255         On-link      10.10.10.111    356
   24.100.100.100  255.255.255.255         10.9.80.1       10.9.80.7     20
NOTE: 10.9.80.7 is my main interface at my client network that is used to get out to the internet. The VPN traffic is encapsulated before it goes thru there. 10.10.10.111 is the IP that the Virtual Network Interface got on the VPN100 interface. Also note that changing the metric from 1 to 100 changes to a different number when you view it from “route print” (its just converted differently when its shown on here but the message is the same)
# here is the ipconfig output showing you the ips of main none-vpn network at the client and the vpn interface ip. I omit extra info thats not needed like IPv6 and DNS suffixes.

> ipconfig /all

Ethernet adapter Ethernet:

   Description . . . . . . . . . . . : Intel(R) 82579LM Gigabit Network Connection
   Physical Address. . . . . . . . . : 00-50-CC-D2-A1-B0
   DHCP Enabled. . . . . . . . . . . : No
   Autoconfiguration Enabled . . . . : Yes
   IPv4 Address. . . . . . . . . . . : 10.9.80.7(Preferred)
   Subnet Mask . . . . . . . . . . . : 255.255.255.0
   Default Gateway . . . . . . . . . : 10.9.80.1
   DNS Servers . . . . . . . . . . . : 8.8.8.8
   NetBIOS over Tcpip. . . . . . . . : Enabled

Ethernet adapter VPN100 - VPN Client:

   Description . . . . . . . . . . . : VPN Client Adapter - VPN100
   Physical Address. . . . . . . . . : 00-AC-39-3C-2B-7F
   DHCP Enabled. . . . . . . . . . . : Yes
   Autoconfiguration Enabled . . . . : Yes
   IPv4 Address. . . . . . . . . . . : 10.10.10.111(Preferred)
   Subnet Mask . . . . . . . . . . . : 255.255.255.0
   Lease Obtained. . . . . . . . . . : Monday, September 28, 2015 5:37:20 PM
   Lease Expires . . . . . . . . . . : Tuesday, September 29, 2015 5:37:21 PM
   Default Gateway . . . . . . . . . : 10.10.10.1
   DHCP Server . . . . . . . . . . . : 10.10.10.1
   DNS Servers . . . . . . . . . . . : 10.10.10.1
   NetBIOS over Tcpip. . . . . . . . : Enabled
At the server:
Now here is the ports we are listening to on the server. First we need to find out the process ID of the VPN server.
# from cmd lets find the process id of the VPN server
> tasklist | find "vpnserver"
vpnserver_x64.exe             3580 Services                   0     32,432 K
We see the process ID is 3580. So now lets see what ports 3580 is listening on.
# having the process ID of the vpn server we can see what ports its using up to listen on

> netstat -nao | find "3580"
  TCP    0.0.0.0:443            0.0.0.0:0              LISTENING       3580
  TCP    0.0.0.0:992            0.0.0.0:0              LISTENING       3580
  TCP    0.0.0.0:1194           0.0.0.0:0              LISTENING       3580
  TCP    0.0.0.0:5555           0.0.0.0:0              LISTENING       3580
  TCP    0.0.0.0:61286          0.0.0.0:0              LISTENING       3580
  TCP    10.10.10.7:59864      130.208.6.126:443      ESTABLISHED     3580
  TCP    [::]:443               [::]:0                 LISTENING       3580
  TCP    [::]:992               [::]:0                 LISTENING       3580
  TCP    [::]:1194              [::]:0                 LISTENING       3580
  TCP    [::]:5555              [::]:0                 LISTENING       3580
  TCP    [::]:61286             [::]:0                 LISTENING       3580
  UDP    0.0.0.0:500            *:*                                    3580
  UDP    0.0.0.0:1194           *:*                                    3580
  UDP    0.0.0.0:4500           *:*                                    3580
  UDP    0.0.0.0:49712          *:*                                    3580
  UDP    0.0.0.0:54611          *:*                                    3580
  UDP    0.0.0.0:58488          *:*                                    3580
  UDP    0.0.0.0:60062          *:*                                    3580
  UDP    10.10.10.7:500        *:*                                    3580
  UDP    10.10.10.7:1194       *:*                                    3580
  UDP    10.10.10.7:4500       *:*                                    3580
  UDP    127.0.0.1:500          *:*                                    3580
  UDP    127.0.0.1:1194         *:*                                    3580
  UDP    127.0.0.1:4500         *:*                                    3580
  UDP    [::]:500               *:*                                    3580
  UDP    [::]:1194              *:*                                    3580
  UDP    [::]:4500              *:*                                    3580
  UDP    [::1]:500              *:*                                    3580
  UDP    [::1]:1194             *:*                                    3580
  UDP    [::1]:4500             *:*                                    3580
  UDP    [2001:0:9d38:81d7:105d:3ef7:e77d:311b]:500  *:*                                    3580
  UDP    [2001:0:9d38:81d7:105d:3ef7:e77d:311b]:1194  *:*                                    3580
  UDP    [2001:0:9d38:81d7:105d:3ef7:e77d:311b]:4500  *:*                                    3580
  UDP    [fe80::105d:3e87:e77d:311b%2]:500  *:*                                    3580
  UDP    [fe80::105d:3e87:e77d:311b%2]:1194  *:*                                    3580
  UDP    [fe80::105d:3e87:e77d:311b%2]:4500  *:*                                    3580
  UDP    [fe80::5d38:268c:e531:5ba6%15]:500  *:*                                    3580
  UDP    [fe80::5d38:268c:e531:5ba6%15]:1194  *:*                                    3580
  UDP    [fe80::5d38:268c:e531:5ba6%15]:4500  *:*                                    3580
  UDP    [fe80::c164:b387:ce10:5aab%9]:500  *:*                                    3580
  UDP    [fe80::c164:b387:ce10:5aab%9]:1194  *:*                                    3580
  UDP    [fe80::c164:b387:ce10:5aab%9]:4500  *:*                                    3580
NOTE: 10.10.10.7 is the Local Area Connection interfaces main IP. Recall Local Area Connection is my main interface on the VPN server which connects up to my network and then to the internet. Note that it connects to 130.208.6.126 which is the University of Tsukuba (I assume this is the softether.net azure network) – I assume this is that middle server, the 3rd server. So if you dont use azure and you use portforwarding method this should go away.
How to connect with an Android phone
Im sure you can do this with an iPhone as well. Also im sure there are other ways (i.e not using OpenVPN or port forwarding port 1194). I will show you how to do this with OpenVPN client. Softether utilizes OpenVPN, so we can use thier clients to connect. Unfortunatly for this I couldnt figure out how to do it without a port forward (it wont connect without it).
At the server side you will need to port forward UDP 1194 to the PC. (so I logged in to my 10.10.10.1 router and I setup a port forward to go from UDP port 1194 to 10.10.10.7 UDP port 1194).
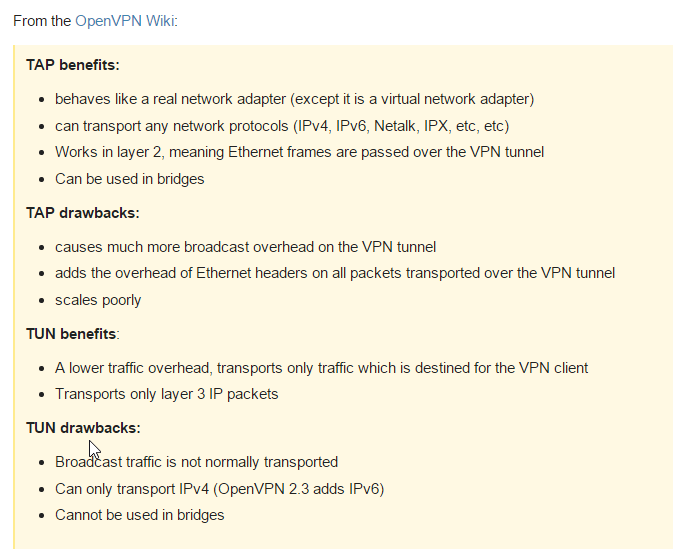
Next with the server manager, download the OpenVPN configurations (the buttons in the interface will be pretty straight forward on how and where to download it). It will come as a zip file. Get that zip file to your phone (copy it to Dropbox, then download it with Dropbox on your phone). Extract that zip on your phone, there will be 2 openvpn configs in there for you to decide on how you want to connect (you can only use the L3 one, not the L2). Different ones have different affects. The L3 one connects your 1 phone to your entire remote network. The L3 (site to site) would connect your network to the other network (we are on a phone though so that wouldnt be a good idea, and either way L2 site-to-site isnt supported on Android OpenVPN Connect because it uses TAP interface)
Download the “OpenVPN Connect” on your phone (this app or similar one could exist for an IPHONE). Open it & then Import the config file to start the connection. Import the one that looks like this “openvpn_remote_access_l3.ovpn”. The other config file one for connecting site-to-site (L2) and again it will not work because OpenVPN Connect doesnt support TAP interfaces. Where as L3 uses the supported TUN interfaces, so that will work. TAP and TUN are different VPN type of linux interfaces.
Now it will ask for your username and password that you picked when you made your user and then it should connect. You can then access anything on the remote network from your phone (10.10.10.7 computer and your NAS thats on 10.10.10.8
NOTE:The Difference between TAP and TUN. A TAP device is a virtual ethernet adapter, while a TUN device is a virtual point-to-point IP link. Even though TUN devices only provide a virtual point-to-point IP link, we are still able to access everything on the remote network (where the VPN server is) by the routing that is setup (it basically says to the phone to reach anything on the 10.10.10.x network go thru the TUN interface to 10.10.10.7, which is the VPN server). For more info: http://security.stackexchange.com/questions/46442/openvpn-tap-vs-tun-mode
NOTE: you will notice in the config it asks to connect to your infotinks123.softether.net which will look like this if your using IPV4 infotinks123.v4.softether.net (both point to the same addresses). Also if you have your own Domain name (such as myplace.infotinks.com), then your domain name & the 2 softher.net address will point to the same address. So they are all interchangeable in the config.
The end.
Good article, thanks.